Black Forest Cheesecake
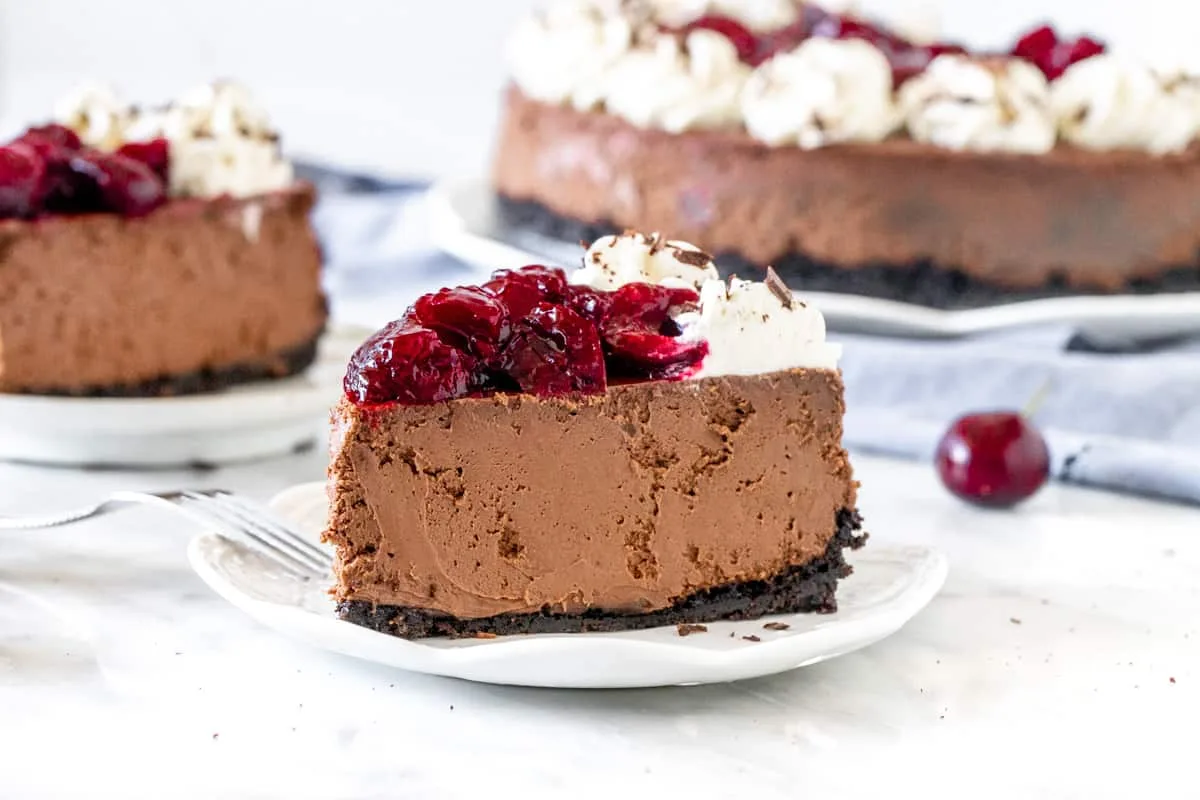
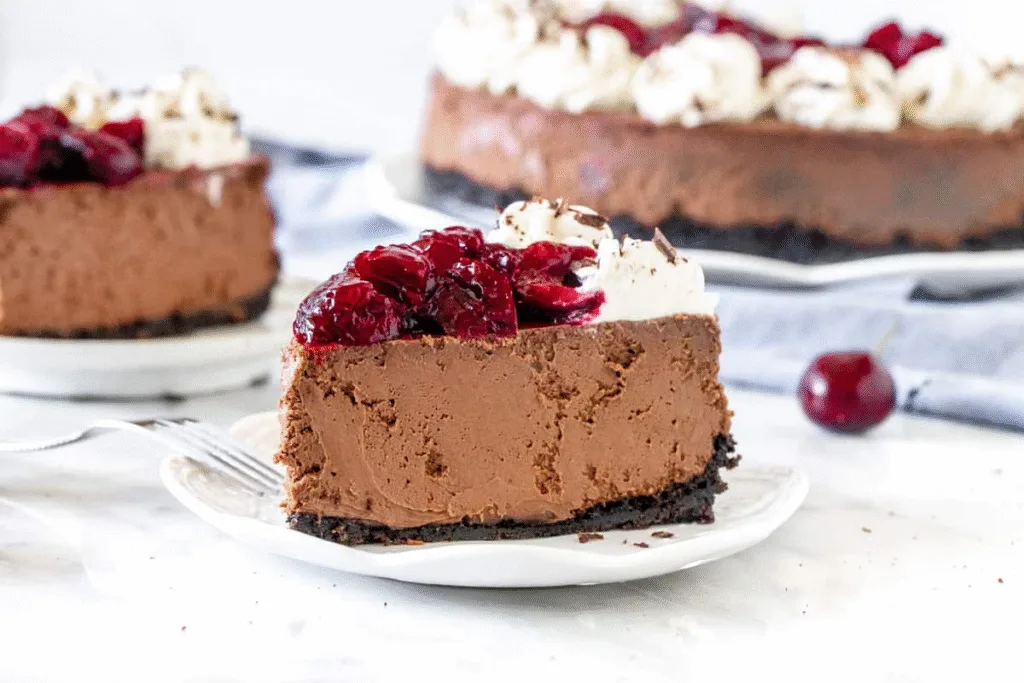
This Black Forest Cheesecake combines a thick Oreo cookie crust with an ultra-creamy dark chocolate cheesecake filling, homemade cherry topping, and lightly sweetened whipped cream. The combination of rich chocolate, bright cherries, and fluffy cream creates the signature Black Forest flavor profile in an elegant baked cheesecake that is especially well suited to celebrations and dinner parties.
Why You’ll Love This Recipe
- Deep Chocolate Flavor – Dark chocolate and cocoa powder work together to give the cheesecake a rich, layered chocolate taste rather than relying on just one source of cocoa.
- Classic Black Forest Combination – Fresh cherries, whipped cream, and chocolate recreate the familiar flavor pairing of traditional Black Forest desserts.
- Thick Oreo Crust – Whole Oreo cookies, including the filling, create a sturdy chocolate base with enough richness to complement the dense cheesecake.
- Creamy Water-Bath Texture – Baking the cheesecake in a water bath helps it cook gently and evenly, reducing the risk of dry edges or large cracks.
- Perfect Make-Ahead Dessert – The cheesecake needs at least 6 hours of chilling and is even better when refrigerated overnight.
- Beautiful for Special Occasions – Whipped cream rosettes, glossy cherry topping, and optional chocolate shavings create a polished presentation without requiring complicated decoration.
Ingredients You’ll Need
For the Oreo Crust
- 24 Oreo cookies, wafers and filling included – Create the thick chocolate cookie base and contribute both sweetness and structure.
- ¼ cup unsalted butter, melted – Binds the cookie crumbs together so the crust remains compact after baking and slicing.
For the Chocolate Cheesecake Filling
- 10 oz (285 g) dark chocolate, 50–70% cocoa – Provides deep chocolate flavor, richness, and additional structure to the filling.
- 24 oz (680 g) full-fat brick-style cream cheese, room temperature – Forms the dense, creamy foundation of the cheesecake.
- 1¼ cups (250 g) granulated sugar – Sweetens the filling and balances the bitterness of the dark chocolate and cocoa.
- 1 tablespoon cocoa powder – Reinforces the chocolate flavor and darkens the filling.
- 2 tablespoons (30 ml) hot water – Dissolves the cocoa powder so it incorporates smoothly without dry lumps.
- ¾ cup (180 ml) sour cream, room temperature – Adds tang, moisture, and a softer, silkier texture.
- 4 large eggs, room temperature – Provide structure as the filling gently sets during baking.
- Boiling water, as needed – Creates the humid water bath that moderates the baking temperature around the cheesecake.
For the Cherry Topping
- 10 oz (280 g) fresh sweet cherries, pitted and halved – Provide the fresh fruit component and signature cherry flavor.
- 1 tablespoon granulated sugar – Encourages the cherries to release their juices and lightly sweetens the topping.
- 2 tablespoons (30 ml) fresh lemon juice – Adds acidity that balances the sweet cherries and rich chocolate cheesecake.
- 2 teaspoons cornstarch – Thickens the released cherry juices into a glossy sauce.
- 2 tablespoons (30 ml) water – Dissolves the cornstarch before it is added to the hot cherries.
For the Whipped Cream
- ½ cup (120 ml) whipping cream, cold – Whips into a light topping that contrasts with the dense chocolate filling.
- 2 teaspoons powdered sugar – Adds a small amount of sweetness and helps the cream hold its shape.
- Chocolate shavings, optional – Reinforce the chocolate flavor and provide an elegant finishing garnish.
Step-by-Step Instructions
Step 1: Prepare the Oven and Pan
Preheat the oven to 325°F (160°C). Wrap the outside of a 9-inch springform pan with at least three layers of heavy-duty foil to help prevent water from entering during the water bath.
Step 2: Make the Oreo Crumbs
Process the Oreo cookies, including the filling, in a food processor until they become fine crumbs. If you do not have a processor, place the cookies in a sturdy freezer bag and crush them thoroughly with a rolling pin.
Step 3: Form the Crust
Mix the Oreo crumbs with the melted butter until evenly moistened. Press the mixture firmly into the bottom of the springform pan, creating a slight raised lip around the edge.
Step 4: Pre-Bake the Crust
Bake the crust for 8 minutes at 325°F (160°C). Remove it from the oven and set it aside while keeping the oven turned on.
Step 5: Melt the Chocolate
Finely chop the dark chocolate and place it in a heatproof bowl. Microwave in 30-second intervals at medium power, stirring thoroughly between each interval, until completely smooth.
Step 6: Beat the Cream Cheese and Sugar
In a very large mixing bowl, beat the room-temperature cream cheese and granulated sugar until smooth and evenly combined. Avoid unnecessary high-speed mixing once the mixture is homogeneous.
Step 7: Add the Melted Chocolate
Pour the melted chocolate into the cream cheese mixture and beat until fully incorporated. Stop the mixer and scrape the sides and bottom of the bowl to ensure no pale cream cheese remains.
Step 8: Dissolve the Cocoa Powder
Whisk the cocoa powder with 2 tablespoons hot water in a small cup until smooth. This prevents dry cocoa pockets and helps distribute the flavor evenly.
Step 9: Add the Cocoa and Sour Cream
Beat the dissolved cocoa mixture and room-temperature sour cream into the cheesecake batter until smooth and uniform.
Step 10: Add the Eggs Carefully
Mix in the eggs one at a time. Stop mixing as soon as each egg is incorporated and the batter is smooth to avoid adding unnecessary air.
Step 11: Fill the Crust
Place the foil-wrapped springform pan inside a large roasting pan. Pour the chocolate cheesecake filling over the Oreo crust and smooth the surface gently.
Step 12: Prepare the Water Bath
Pour hot water into the roasting pan until it reaches approximately ½–1 inch (1–2 cm) up the outside of the springform pan. Take care not to splash water into the cheesecake.
Step 13: Bake the Cheesecake
Bake for 55–65 minutes. The top should look set around the edges while the center still has a gentle wobble when the pan is carefully nudged.
Step 14: Cool in the Water Bath
Remove the roasting pan from the oven and allow the cheesecake to cool while still sitting in the water bath until the water reaches approximately room temperature.
Step 15: Continue Cooling
Remove the springform pan from the roasting pan and transfer it to a wire rack. Leave the outer springform ring attached and allow the cheesecake to cool fully to room temperature.
Step 16: Chill Thoroughly
Cover the pan with foil and refrigerate for at least 6 hours, preferably overnight. Proper chilling allows the cheesecake to fully set and makes slicing much cleaner.
Step 17: Prepare the Cherry Topping
Pit and halve the cherries, then place them in a medium saucepan with the granulated sugar and lemon juice. Cook over low heat, stirring gently, until the cherries soften and begin releasing their juices.
Step 18: Thicken the Cherries
Stir the cornstarch and water together until completely smooth. Add the slurry to the cherries and continue stirring until the liquid thickens into a glossy sauce, then remove from the heat and cool.
Step 19: Whip the Cream
Beat the cold whipping cream and powdered sugar until peaks form. Transfer the cream to a piping bag fitted with a large star tip if you want decorative rosettes.
Step 20: Release the Cheesecake
Remove the chilled cheesecake from the refrigerator and carefully run a thin, sharp knife around the outside edge. Unclamp and remove the springform ring.
Step 21: Decorate and Serve
Pipe whipped cream rosettes around the outer edge, spoon the cherry topping into the center, and finish with chocolate shavings if desired. Slice with a thin, sharp knife, cutting firmly through the Oreo crust.
Recipe Notes & Tips
- Use Full-Fat Brick-Style Cream Cheese – Spreadable, whipped, or low-fat cream cheese contains a different moisture balance and can make the cheesecake softer or less stable.
- Bring Ingredients to Room Temperature – Cream cheese, sour cream, and eggs should sit out for approximately 30 minutes before mixing so they blend smoothly.
- Wrap the Pan Thoroughly – Multiple foil layers reduce the chance of water entering through the springform seam during baking.
- Mix the Eggs Gently – Once eggs are introduced, mix only until incorporated. Excess air can expand in the oven and contribute to cracking.
- Do Not Overbake – The center should still wobble slightly when the cheesecake leaves the oven. Residual heat and chilling will complete the setting process.
- Make It a Day Ahead – Cooling and chilling overnight gives the cheesecake excellent structure and makes the final decoration much easier.
Nutritional Information
- Prep Time: 1 hour
- Cooking Time: 1 hour
- Chilling Time: 6 hours
- Total Time: Approximately 8 hours
- Servings: 12 slices
- Serving Size: 1 slice with cherries and whipped cream
- Calories: Approximately 671 calories per serving
- Protein: Approximately 10 g
- Carbohydrates: Approximately 58 g
- Fiber: Approximately 4 g
- Sugar: Approximately 43 g
- Total Fat: Approximately 46 g
- Saturated Fat: Approximately 25 g
- Polyunsaturated Fat: Approximately 3 g
- Monounsaturated Fat: Approximately 13 g
- Trans Fat: Approximately 1 g
- Cholesterol: Approximately 156 mg
- Sodium: Approximately 337 mg
- Potassium: Approximately 412 mg
- Vitamin A: Approximately 1230 IU
- Vitamin C: Approximately 3 mg
- Calcium: Approximately 115 mg
- Iron: Approximately 6 mg
Nutritional information is an estimate based on dividing the finished cheesecake into 12 equal portions. Because this is a particularly rich dessert, it can also be cut into 14 smaller slices for more moderate portions.
Perfect Pairings
- Fresh Espresso – Its concentrated bitterness contrasts well with the sweet cherries and rich dark chocolate filling.
- Fresh Berries – Raspberries or strawberries add acidity and freshness alongside the dense cheesecake.
- Extra Cherry Compote – A small spoonful on the side intensifies the fruit flavor for guests who prefer more cherry.
- Dark Chocolate Shavings – Additional bittersweet chocolate adds visual appeal and reinforces the Black Forest flavor profile.
Ideal Occasions
- Dinner Parties – The elegant cherry center and piped whipped cream make this cheesecake especially impressive for entertaining.
- Birthday Celebrations – Its rich chocolate flavor and polished appearance make it a strong alternative to traditional birthday cake.
- Holiday Desserts – The dramatic dark chocolate and red cherry combination works particularly well on festive dessert tables.
- Anniversaries and Special Events – Because it looks sophisticated and can be prepared the day before, it is ideal for occasions where presentation matters.
Storage & Serving Tips
- Refrigerate Leftovers – Store covered cheesecake in the refrigerator for up to 4 days.
- Keep the Topping Chilled – If making the cherry topping in advance, refrigerate it separately until you are ready to decorate.
- Slice With a Clean Knife – Use a thin, sharp knife and wipe it clean between slices to keep the layers neat.
- Serve Cold or Slightly Tempered – The cheesecake holds its shape best when cold, but allowing individual slices to sit for 10–15 minutes can soften the texture slightly and enhance the chocolate flavor.
Creative Variations to Try
- Extra-Dark Chocolate Version – Use chocolate closer to 70% cocoa for a less sweet and more intense chocolate profile.
- Cherry Liqueur Version – Add a small amount of cherry liqueur to the cooled cherry topping for a more grown-up flavor variation.
- Raspberry Chocolate Cheesecake – Replace the cherries with raspberries and prepare the topping using the same cornstarch-thickening method.
- Mini Black Forest Cheesecakes – Divide the crust and filling among individual molds or muffin cups and reduce the baking time accordingly.
Troubleshooting Common Issues
- Cheesecake Cracks on Top – The filling may have been overmixed or overbaked. Mix gently after adding the eggs and remove the cheesecake while the center still has a slight wobble.
- Water Leaks Into the Crust – The foil wrapping may not be sufficiently watertight. Use multiple layers or place the springform pan inside a slightly larger cake pan before placing it in the water bath.
- Cheesecake Filling Is Lumpy – The cream cheese was likely too cold. Bring it fully to room temperature before mixing with the sugar.
- Cherry Topping Is Too Thin – The cornstarch may not have cooked long enough. Continue heating gently until the sauce visibly thickens, keeping in mind that it will firm further as it cools.
Why This Recipe Works
This Black Forest Cheesecake succeeds because each component contributes a specific structural and flavor function. The Oreo crust is pre-baked so it develops enough firmness to support the heavy filling, while dark chocolate contributes cocoa solids and cocoa butter that deepen flavor and help create a dense, luxurious texture. Dissolving cocoa powder in hot water allows it to disperse evenly throughout the batter without creating dry pockets. Sour cream provides moisture and tang, while the eggs slowly coagulate during baking and give the cheesecake its final structure. The water bath surrounds the springform pan with gentle, moist heat, which slows down edge cooking and reduces the temperature difference between the exterior and center. The fresh cherry topping introduces acidity that cuts through the high fat content of the chocolate and cream cheese, and the whipped cream adds a lighter textural contrast. At approximately 671 calories per 1-of-12 slice, this is a deliberately rich dessert, and dividing it into 14 portions can reduce the calorie load per serving.
Final Thoughts
Black Forest Cheesecake combines a crisp Oreo base, intensely creamy chocolate filling, glossy fresh cherry topping, and airy whipped cream into a dessert that feels both classic and luxurious. The water-bath baking method and extended chilling time require patience, but they are key to achieving the smooth texture and clean slices that make this cheesecake so impressive. For a lighter approach, cut smaller portions, use a thinner layer of whipped cream, or serve extra fresh cherries alongside each slice instead of additional chocolate garnishes.