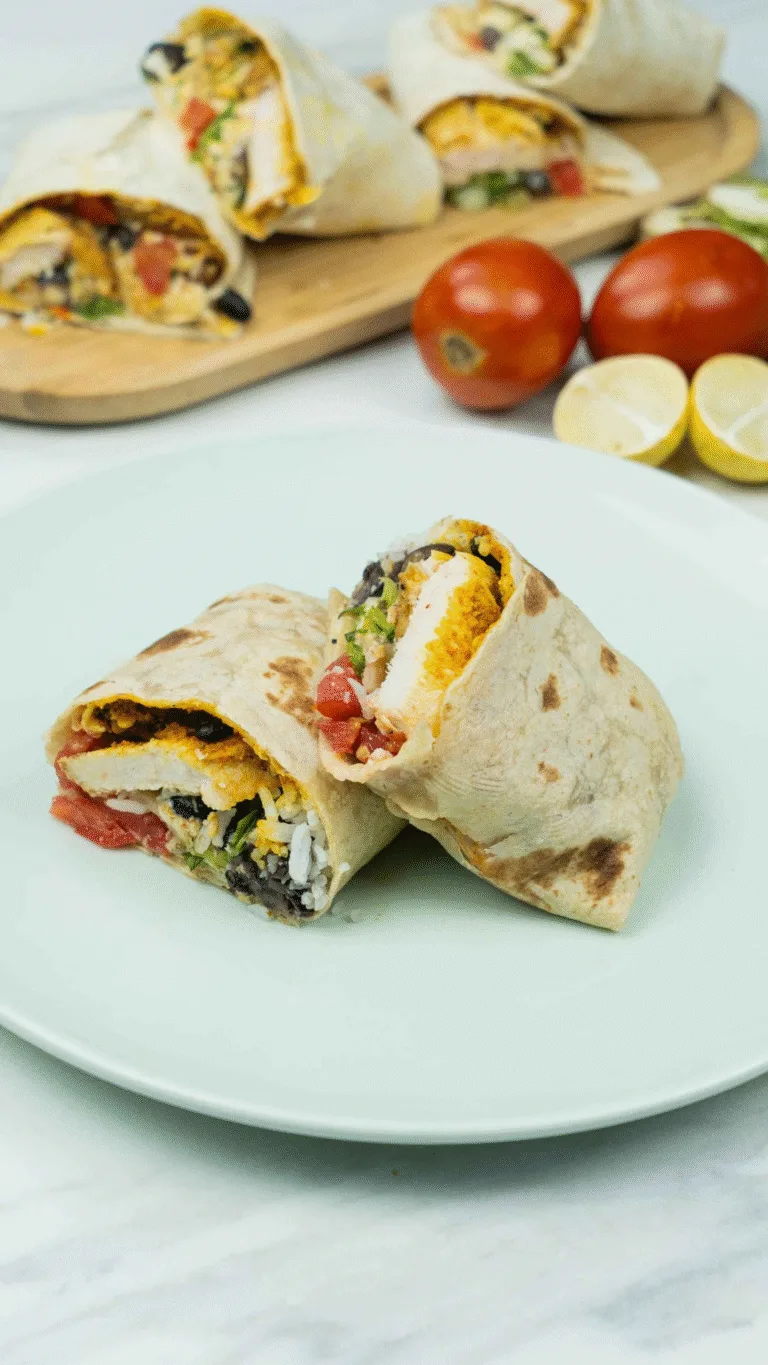
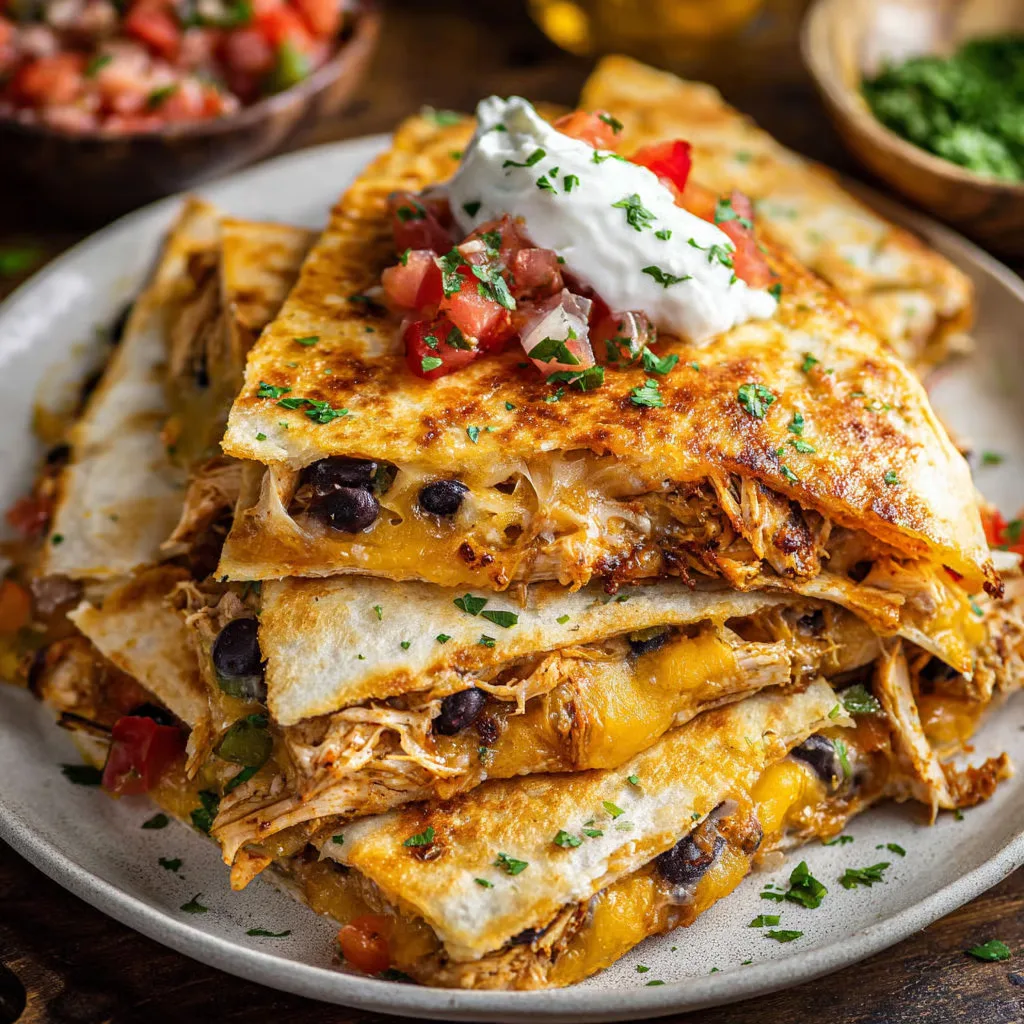
Sheet Pan Quesadilla
The Sheet Pan Quesadilla is a game-changing method for feeding a group without the hassle of flipping individual tortillas over a hot stove. This oven-baked technique produces a massive, crispy-golden quesadilla stuffed with seasoned chicken, fiber-rich black beans, and sautéed vegetables. By using the high, even heat of a 400°F oven, the cheese melts into a perfect binder while the flour tortillas develop a satisfying, cracker-like crunch that is perfect for slicing into shareable wedges.
Why You’ll Love This Recipe
- Hands-Off Cooking – No more standing over a skillet; the oven handles the crisping and melting for the entire family at once.
- Uniform Crunch – The sheet pan method ensures the tortillas are toasted evenly from edge to edge without the risk of tearing during a flip.
- Highly Adaptable – Easily swapped for vegetarian, extra spicy, or meat-heavy versions depending on your pantry staples.
- Ideal for Meal Prep – These wedges hold their structure well and can be reheated in an air fryer for a quick, crispy lunch.
- Hidden Veggie Vehicle – A great way to incorporate bell peppers and onions into a meal that even picky eaters will enjoy.
- Perfect for Hosting – One sheet pan yields a large volume of “wedges,” making it the ultimate low-stress appetizer for game days or casual get-togethers.
Ingredients You’ll Need
The Foundation
- 4 Large Flour Tortillas – Burrito-sized tortillas provide the best coverage for a standard baking sheet.
- 1.5 to 2 cups Shredded Cheese – A Mexican blend or sharp Cheddar provides the best melt and “cheese pull.”
The Filling
- 1 cup Cooked Chicken – Shredded rotisserie chicken is a perfect time-saver here.
- 1/2 cup Black Beans – Drained and rinsed to add protein and earthy texture.
- 1/2 cup Bell Peppers & 1/2 cup Onions – Thinly sliced to ensure they soften during the short bake time.
Seasoning & Toppings
- Olive Oil – To coat the pan and ensure a golden-brown bottom crust.
- Salt & Black Pepper – To brighten the flavors of the fresh vegetables.
- Garnish – Salsa, sour cream, and guacamole for that classic cool-and-creamy finish.
Step-by-Step Instructions
Oven and Pan Prep Preheat your oven to 400°F (200°C). Use a pastry brush or paper towel to lightly coat a large rimmed baking sheet with olive oil. This is the secret to getting a “fried” texture on the bottom tortilla.
Layer the Base Lay two flour tortillas flat on the baking sheet. They should be centered and slightly overlapping to create a continuous base for your fillings.
Stuff the Quesadilla Distribute the shredded cheese evenly across the tortillas. Follow with the shredded chicken, bell peppers, onions, and black beans. Sprinkle with a pinch of salt and freshly ground black pepper. Tip: Keep the fillings about half an inch away from the very edge to prevent them from falling out.
Seal and Bake Place the remaining two tortillas over the fillings to fully encase them. Transfer the sheet pan to the oven and bake for 8–10 minutes. The cheese should be bubbling and the tortillas should be crisp to the touch.
Slice and Serve Remove from the oven and let rest for 2 minutes (this keeps the cheese from sliding out when cut). Transfer to a cutting board, slice into wedges or squares using a pizza cutter, and serve with your favorite dips.
Recipe Notes & Tips
- Weight it Down – For an even crispier top, you can place a second baking sheet on top of the quesadillas for the first 5 minutes of baking to “press” them.
- Tortilla Choice – Flour tortillas work best for this method as they are more pliable and brown more evenly than corn tortillas.
- Pre-Sauté the Veggies – If you prefer your onions and peppers very soft, give them a quick 3-minute sauté in a pan before adding them to the quesadilla.
- Avoid Sogginess – Ensure your black beans are very well-drained and patted dry. Excess moisture is the enemy of a crispy tortilla.
- Cheese Ratio – Don’t be shy with the cheese; it acts as the “glue” that keeps the top tortilla attached to the fillings.
Nutritional Information
- Prep Time: 10 minutes
- Cook Time: 10 minutes
- Total Time: 20 minutes
- Servings: 4–6 servings
- Calories: 380 kcal (Estimated per serving)
Perfect Pairings
- Cilantro Lime Rice – A zesty, bright side dish that balances the richness of the melted cheese.
- Mexican Street Corn (Elote) – Provides a smoky, creamy contrast to the crunchy quesadilla.
- Pickled Red Onions – Adds a pop of acidity and color to the plate.
- Ice-Cold Michelada – The savory, spicy notes of the drink pair perfectly with the cheesy chicken filling.
Ideal Occasions
- Busy Weeknights – A 20-minute meal that requires zero active stove time.
- Kids’ Sleepovers – Easily customizable so everyone gets a section with their favorite fillings.
- Game Day Appetizer – Slices into many small wedges for easy, handheld snacking.
- Fridge Clean-out – The perfect vessel for leftover steak, roasted veggies, or different types of cheese.
Storage & Serving Tips
- Refrigeration – Store leftover wedges in an airtight container for up to 3 days.
- Reheating – Use a toaster oven or air fryer at 350°F for 3–5 minutes. This restores the crunch that a microwave would destroy.
- Dipping Strategy – Serve the salsa and sour cream in small ramekins on the side rather than on top to prevent the tortillas from getting soggy.
- Freezing – You can freeze the wedges between layers of parchment paper for up to a month. Reheat directly from frozen in the oven.
Creative Variations to Try
- Breakfast Sheet Pan Quesadilla – Fill with scrambled eggs, cooked chorizo, and tater tots.
- Buffalo Chicken Style – Toss the shredded chicken in buffalo sauce and use ranch dressing as a dipping sauce.
- BBQ Pulled Pork – Use leftover pulled pork, red onions, and a drizzle of BBQ sauce inside the tortillas.
- Sweet & Savory – Add thinly sliced Granny Smith apples and brie cheese alongside the chicken for a gourmet twist.
Troubleshooting Common Issues
- Tortillas are Soft – Your oven might not be hot enough or you skipped the oil on the pan. Ensure it hits 400°F before the tray goes in.
- Fillings Falling Out – You might have overstuffed the edges. Keep the “guts” of the quesadilla centered and let it rest for 2 minutes before cutting.
- Burned Edges – If the edges of the tortillas are browning too fast, lightly brush them with a tiny bit of water or oil before baking.
- Cheese Didn’t Melt – If the tortilla is brown but the cheese is cold, lower the rack in your oven to get the pan closer to the heat source.
Why This Recipe Works
The Sheet Pan Quesadilla succeeds through conduction and radiant heat. The oil on the baking sheet conducts heat directly into the bottom tortilla, essentially “frying” it against the metal. Meanwhile, the 400°F ambient air circulates around the top tortilla to crisp it. The cheese acts as a thermal insulator, trapping the steam from the chicken and veggies inside, which ensures the fillings stay juicy while the exterior stays crunchy.
Final Thoughts
This method proves that you don’t need a professional griddle to achieve restaurant-quality quesadillas. By leveraging the surface area of a sheet pan, you turn a labor-intensive dish into a streamlined, high-efficiency meal. It’s a versatile technique that every home cook should have in their back pocket for those nights when time is short but the craving for comfort food is high.