Black Forest Cheesecake Bars
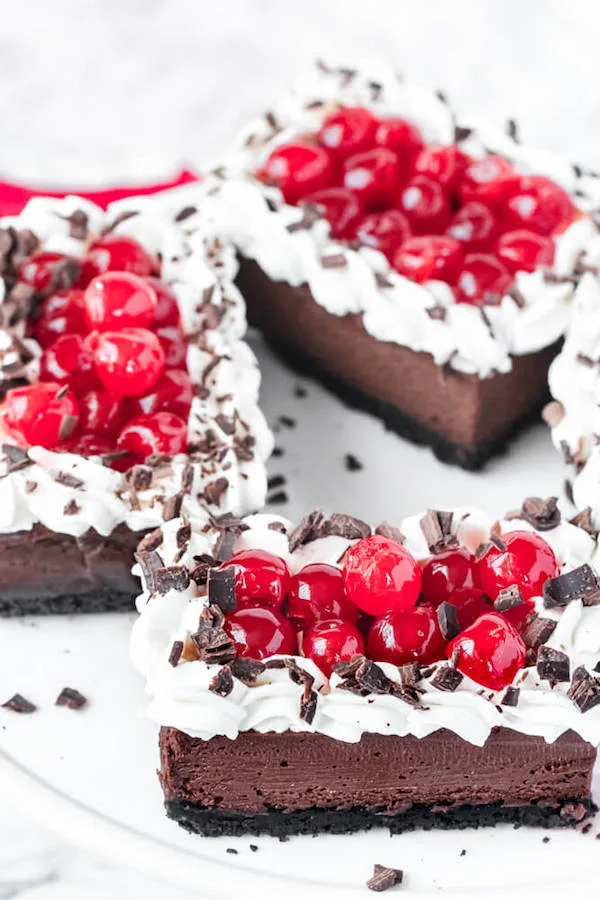
These Black Forest Cheesecake Bars combine a crisp chocolate Oreo crust with an intensely rich chocolate cheesecake filling, fluffy vanilla whipped cream, and a glossy cherry topping. Inspired by classic Black Forest flavors, the combination of bittersweet chocolate, tart-sweet cherries, and creamy cheesecake creates a decadent layered dessert with contrasting textures in every bite.
Why You’ll Love This Recipe
- Rich Black Forest Flavor – Chocolate, cherries, and whipped cream recreate the signature combination of a classic Black Forest dessert in cheesecake-bar form.
- Deep Chocolate Cheesecake – Melted bittersweet or semisweet chocolate and cocoa powder work together to produce a filling with a more developed chocolate flavor than cocoa alone.
- Crunchy Oreo Crust – Chocolate sandwich cookie crumbs create a sturdy, crisp base that contrasts beautifully with the smooth cheesecake.
- Perfect Make-Ahead Dessert – The cheesecake needs at least 4 hours to chill, making it ideal for preparing the night before a celebration or gathering.
- Two Presentation Options – Keep things simple by spreading the toppings over the entire cheesecake, or decorate individual bars with piped whipped cream for an elegant presentation.
- Excellent for Special Occasions – The dramatic chocolate-and-cherry appearance makes these bars particularly suitable for holidays, birthdays, dinner parties, and dessert tables.
Ingredients You’ll Need
For the Oreo Crust
- 3 cups Oreo cookie crumbs, about 36 Oreos – Form the dark chocolate base and provide a crunchy contrast to the creamy cheesecake.
- ½ cup unsalted butter, melted – Binds the cookie crumbs together so the crust holds its shape when sliced.
For the Chocolate Cheesecake Filling
- 12 oz bittersweet or semisweet chocolate, melted and cooled – Provides the primary chocolate flavor and contributes richness and structure to the filling.
- 3 (8 oz) packages cream cheese, 24 oz total, softened to room temperature – Creates the dense, creamy foundation of the cheesecake.
- ¾ cup granulated sugar – Sweetens the filling and balances the bitterness of the chocolate and cocoa.
- ¼ cup light brown sugar, packed – Adds sweetness along with subtle caramel and molasses notes.
- 2 tablespoons unsweetened cocoa powder, sifted – Intensifies the chocolate flavor without adding additional moisture.
- 1 tablespoon cornstarch – Helps stabilize the cheesecake filling and improves its ability to set cleanly. Three tablespoons all-purpose flour may be substituted.
- 1 cup sour cream, room temperature – Adds moisture and tang while creating a smoother, creamier texture.
- ½ cup heavy cream, room temperature – Adds richness and helps soften the dense cream cheese base.
- 2 teaspoons pure vanilla extract – Rounds out the chocolate flavor and adds aromatic sweetness.
- 3 large eggs, room temperature – Provide structure as the cheesecake gently bakes and sets.
- 1 large egg yolk, room temperature – Adds additional richness and creates a more luxurious texture.
For the Sweetened Whipped Cream
- 1 cup heavy cream, thoroughly chilled – Whips into a light topping that contrasts with the dense chocolate cheesecake.
- 6 tablespoons powdered sugar – Sweetens and slightly stabilizes the whipped cream while dissolving easily.
- 1 teaspoon pure vanilla extract – Adds warm vanilla flavor to the cream.
For the Cherry Topping
- 1 (18 oz) can cherry pie filling – Provides the glossy, sweet-tart cherry component associated with Black Forest desserts.
- Chocolate shavings, as needed – Add an elegant finishing touch while reinforcing the chocolate flavor.
Step-by-Step Instructions
Step 1: Prepare the Baking Pan
Preheat the oven to 325°F (165°C). Line a 9×13-inch baking pan with aluminum foil or parchment paper, leaving approximately 2 inches of overhang on the sides, then lightly coat with non-stick cooking spray.
Step 2: Make the Oreo Crust
Combine the Oreo crumbs and melted butter in a medium bowl until all the crumbs are evenly moistened. Transfer the mixture to the prepared pan and press it firmly into an even layer across the bottom.
Step 3: Pre-Bake the Crust
Bake the crust for 10 minutes at 325°F (165°C). Remove it from the oven and set it aside to cool slightly while preparing the cheesecake filling.
Step 4: Melt the Chocolate
Place the chopped bittersweet or semisweet chocolate in a heat-safe bowl positioned over a saucepan of gently simmering water. Stir continuously until completely melted and smooth, then remove from the heat and allow it to cool until no longer hot.
Step 5: Smooth the Cream Cheese
Place the room-temperature cream cheese in a large mixing bowl and beat with a handheld mixer on low speed until smooth and creamy. Avoid high-speed mixing, which can incorporate excessive air into the batter.
Step 6: Add the Sugars and Dry Ingredients
Add the granulated sugar, packed brown sugar, sifted cocoa powder, and cornstarch. Continue mixing on low speed until evenly incorporated and smooth.
Step 7: Incorporate the Creamy Ingredients
Scrape down the sides and bottom of the bowl before adding the room-temperature sour cream, heavy cream, and vanilla extract. Mix on low speed just until the batter becomes smooth and uniform.
Step 8: Add the Melted Chocolate
Pour the cooled melted chocolate into the cheesecake mixture and mix gently on low speed until the batter is evenly chocolate-colored with no visible streaks.
Step 9: Add the Eggs Gradually
Add the 3 eggs and additional egg yolk one at a time, mixing slowly after each addition only until incorporated. Avoid overbeating once the eggs are added because excess air can cause the cheesecake to rise excessively and crack as it cools.
Step 10: Remove Air Bubbles
Scrape the bowl thoroughly with a rubber spatula to ensure the filling is evenly mixed. Firmly tap the mixing bowl against the countertop several times to encourage trapped air bubbles to rise to the surface.
Step 11: Bake the Cheesecake
Pour the chocolate cheesecake filling evenly over the prepared Oreo crust and smooth the surface. Bake at 325°F (165°C) for 30–35 minutes, until the edges appear set while the center retains a slight jiggle when the pan is gently moved.
Step 12: Cool Completely
Transfer the pan to a wire cooling rack and allow the cheesecake to cool completely at room temperature. Carefully run the tip of a butter knife around the edges if necessary to loosen any areas touching the pan or foil.
Step 13: Chill Until Firm
Loosely cover the cooled cheesecake with plastic wrap and refrigerate for at least 4 hours, preferably overnight. Proper chilling allows the filling to become firm enough for clean slicing.
Step 14: Prepare the Whipped Cream
Place the chilled heavy cream, powdered sugar, and vanilla in a cool stainless steel mixing bowl. Beat with a handheld mixer until the cream forms defined peaks that hold their shape without becoming grainy.
Step 15: Remove and Slice the Cheesecake
Use the parchment or foil overhang to carefully lift the thoroughly chilled cheesecake from the pan. Transfer it to a cutting board before decorating or slicing.
Step 16: Decorate the Cheesecake Bars
For a simple presentation, spread the whipped cream over the entire cheesecake, spoon the cherry filling over the top, and finish with chocolate shavings before slicing. For individually decorated bars, slice first, pipe whipped cream around the perimeter of each piece, spoon cherry filling into the center, and garnish with chocolate shavings.
Recipe Notes & Tips
- Use Room-Temperature Filling Ingredients – Cream cheese, sour cream, heavy cream, and eggs incorporate more smoothly when they are at similar temperatures, reducing the likelihood of lumps.
- Mix the Eggs Gently – Once the eggs are added, use low speed and stop mixing as soon as they disappear into the batter. Excessive aeration is one of the primary causes of cheesecake cracking.
- Cool the Melted Chocolate Slightly – Chocolate that is still very hot can affect the cream cheese mixture and potentially create an uneven filling. It should remain fluid but no longer feel hot before being incorporated.
- Don’t Overbake the Cheesecake – The center should still jiggle slightly when removed from the oven. Residual heat will continue setting the cheesecake during cooling.
- Chill Before Cutting – A minimum 4-hour refrigeration period is essential for structure. Overnight chilling generally produces the cleanest slices and most developed texture.
- Clean the Knife Between Cuts – For professional-looking bars, use a large sharp knife and wipe the blade clean after every cut. Slightly warming and drying the knife can make slicing even cleaner.
Nutritional Information
- Prep Time: 25 minutes
- Cooking Time: 45 minutes
- Chilling/Additional Time: 4 hours
- Total Time: Approximately 5 hours 10 minutes
- Yield: 8 large cheesecake bars
- Serving Size: 1 bar
- Calories: Approximately 866 calories per large bar
- Protein: Approximately 10 g
- Carbohydrates: Approximately 88 g
- Fiber: Approximately 4 g
- Sugar: Approximately 70 g
- Total Fat: Approximately 57 g
- Saturated Fat: Approximately 32 g
- Unsaturated Fat: Approximately 21 g
- Trans Fat: Approximately 1 g
- Cholesterol: Approximately 218 mg
- Sodium: Approximately 205 mg
Nutritional values are estimates based on dividing the cheesecake into 8 large bars. Cutting the cheesecake into smaller portions will significantly reduce the calories and other nutritional values per serving.
Perfect Pairings
- Fresh Cherries or Berries – Fresh fruit adds acidity and freshness that helps balance the dense chocolate cheesecake and sweet cherry topping.
- Freshly Brewed Coffee – The bitterness and roasted notes of coffee complement bittersweet chocolate while balancing the richness of the cheesecake.
- Espresso – A small espresso provides an intense bitter contrast that works especially well after a rich meal.
- Extra Dark Chocolate – A small amount of finely grated dark chocolate enhances the cocoa flavor while creating an elegant finishing touch.
Ideal Occasions
- Holiday Dessert Tables – The dramatic dark chocolate, white cream, and red cherry layers make these bars an attractive centerpiece for festive dessert spreads.
- Birthdays and Celebrations – Their rich flavor and decorative appearance make them an excellent alternative to traditional birthday cake.
- Valentine’s Day – Chocolate and cherries create a naturally fitting combination for a romantic dessert.
- Dinner Parties – Because the cheesecake can be prepared the previous day, it is an especially convenient dessert when entertaining guests.
Storage & Serving Tips
- Refrigerate Properly – Store the cheesecake bars in an airtight container in the refrigerator for approximately 3–5 days.
- Keep Them Chilled – Cheesecake contains substantial amounts of dairy and eggs, so avoid leaving the bars at room temperature for extended periods.
- Decorate Close to Serving – For the neatest presentation, particularly when piping individual portions, add the whipped cream and cherry filling shortly before serving.
- Cut Smaller Portions if Desired – These bars are exceptionally rich. The 9×13-inch cheesecake can easily be divided into smaller squares when serving a larger group.
Creative Variations to Try
- Fresh Cherry Black Forest Bars – Replace some or all of the canned pie filling with a homemade cherry compote prepared from fresh or frozen cherries.
- Dark Chocolate Version – Use high-cacao bittersweet chocolate and dark chocolate shavings for a less sweet, more intense cocoa profile.
- Chocolate-Cherry Swirl Bars – Spoon small amounts of thick cherry filling over the unbaked cheesecake and gently swirl it into the surface before baking.
- Mini Cheesecake Bites – Cut the thoroughly chilled cheesecake into smaller squares and top each one individually with a small whipped cream rosette and a cherry.
Troubleshooting Common Issues
- Cheesecake Develops Cracks – The batter may have been overmixed, particularly after adding the eggs, or the cheesecake may have been overbaked. Mix slowly and remove it when the center still has a gentle jiggle.
- Cheesecake Filling Is Lumpy – The cream cheese was probably too cold. Allow it to soften fully to room temperature and beat it smooth before introducing the other ingredients.
- Crust Falls Apart When Sliced – The Oreo mixture may not have been compressed firmly enough or may not have chilled sufficiently. Press it firmly into the pan and allow the completed cheesecake to chill thoroughly before cutting.
- Whipped Cream Won’t Hold Peaks – The cream or mixing equipment may be too warm. Use thoroughly chilled heavy cream and, if necessary, chill the mixing bowl and beaters before whipping.
Why This Recipe Works
These Black Forest Cheesecake Bars rely on careful control of fat, moisture, temperature, and aeration. Cream cheese provides the dense structural base, while sour cream and heavy cream soften its texture and introduce enough moisture for a luxurious mouthfeel. Melted chocolate contributes cocoa solids and cocoa butter, intensifying both flavor and richness, while additional cocoa powder creates even deeper chocolate character. Cornstarch helps stabilize the egg-and-dairy mixture as it sets in the oven, and gentle low-speed mixing minimizes trapped air that could expand during baking and cause cracks during cooling. The pre-baked Oreo crust provides a firm textural contrast, while the cherry topping contributes acidity that cuts through the considerable richness of the chocolate and dairy. At approximately 866 calories per large bar when divided into 8 servings, this is an intentionally decadent dessert, and smaller portions can substantially reduce the calorie content per serving.
Final Thoughts
Black Forest Cheesecake Bars turn the classic combination of chocolate, cherries, and whipped cream into an impressive layered dessert with a crisp Oreo crust and exceptionally creamy chocolate center. They require several hours of chilling, but most of that time is completely hands-off, making them an excellent make-ahead option for celebrations and entertaining. With approximately 866 calories per very large 1-of-8 serving, these bars are particularly rich; cutting the cheesecake into 12, 16, or even smaller portions is an easy way to create more moderate servings while preserving the full Black Forest experience.